3 Ways to Make Reels
Reels are a 60-90 second video clips that play conveniently on mobile devices through platforms that allow creators to shoot, design, edit and post them. Each platform calls these short-vertical videos something unique. Facebook and Instagram call them “Reels.” Youtube calls them “Shorts.” For the purpose of simplicity we’ll just call any video that is under 90 seconds and formatted vertically a “reel.”
Method 1: The Simplest Way to Make a Reel
You can shoot a reel on your phone simply by pointing your phone camera at something and recording. You don’t have to turn your phone on its side.
Tools Needed: Your phone camera
Procedure: Keep the phone oriented straight up and down. And then you simply point and shoot. You can usually do this through a camera function directly on the platform you will post through. It’s just like the original cameras, that allowed you to shoot, develop and screen films all through one device.
Posting: Platforms have gotten incredibly complex and allow editing multiple clips together or pausing the recording and restarting it to form different shots. Users can add stickers, compose on-screen text and use AI to make this process very easy.
Anybody can make reels this way if they own a phone. If they have connection to the internet and are of age they can share them too.
As a result to this open access of videography, a variety of content has blossomed. It’s natural to pick up a camera and point it at something. And it’s possible to have that video become very popular because of a trending topic or important event.
Make Short Reels into Full-Length Youtube Content
If you ONLY MAKE SHORT REELS, you will want to consider mashing them up into a longer video where your loyal subscribers can binge thematically grouped reels. In this case, your reel isn’t born from longer content, but your reels form your longer content. In any case, you always want to give an option for longer content and visits to your profile. Lots of posts will be a great way to make this possible.
Method 2: Can You Make a “Reel” with a DSLR Camera?
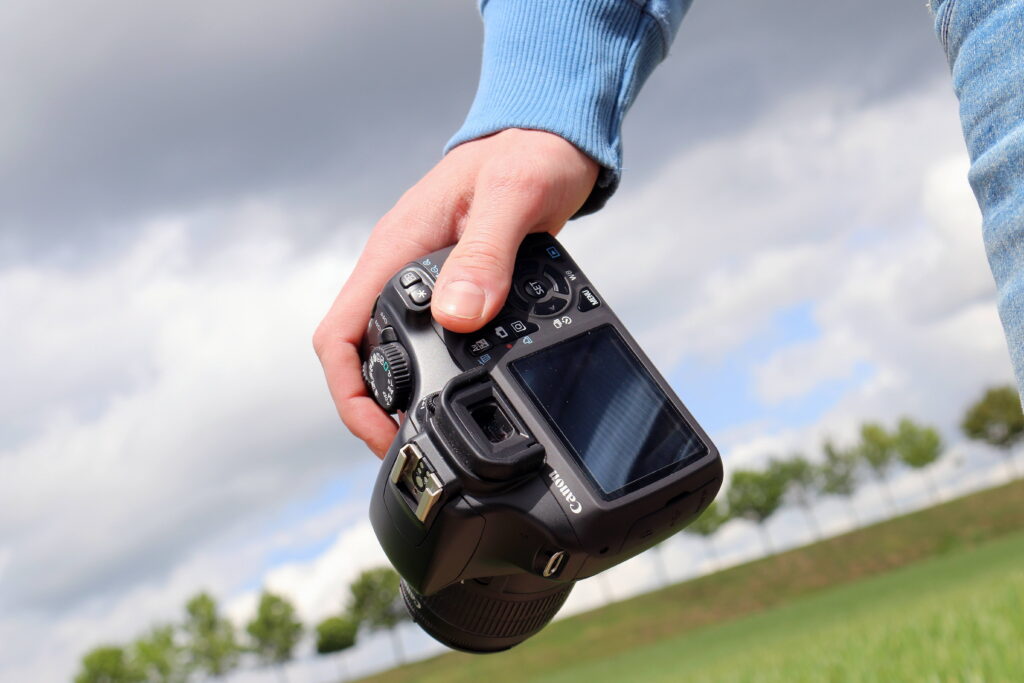
Just like you can turn your phone camera sideways to get a wide video instead of a tall one, you can turn your regular camera on its side too and it will film the world in that 90-degree direction.
The camera doesn’t care about the horizon, unless you have a GoPro. GoPros will automatically keep the image straight up and down, even if the camera turns over; however, this is not common. Usually, as the camera rotates, the horizon stays put and this creates a totally different frame size which the photographer must account for.
Formatted Vertically
Calling a reel a “Reel” really gets to the heart of what a short-vertical is. It’s a highlight “reel.” So this means, your “reel” is born from longer content and should always lead to longer content.
In this context, we are using reels to promote something. Not to just share our daily moments. Don’t get me wrong you can do that too! However, if you’re reading this, it’s because you want to use reels effectively to sell something or build a following.
Can Reels be used as Advertisements?
Your longer content is where you should do the selling. Ads which attempt to sell directly to you through short targeted reels are difficult to plan and execute on a budget. You can trial and error this process cheaply, but the real pros will have a reason for you to spend much more…and rightly so. There are a lot of levers to pull and buttons to push to advertise effectively with short videos. That’s why people go to school for this and the entire world at times seems to revolve around it.
But, you don’t have to be super clever to make a reel. And you don’t have to be more than proficient to make a full-length video that sells your true thing. Your true thing may be subscriptions. Your thing might be something that you can hold. Something that you can deliver. Something all encompassing.
Techniques and Strategies to Try Now
If you’re looking to string short video clips together into longer content and you want some help making a branded message that tells a complete story of your family, your product/service or your brand, you should reach out and let’s talk about how to make the videos you want to make. In the meantime, here is one more method for making reels. Warning, this one is a little advanced and kind of involved.
Method 3: Scaling Video up and Down/Cropping
If you decided to shoot a video in a wide frame you will have to make a choice when editing a reel.
Option 1: Do you want to make the image smaller and allow for empty space on the top and bottom?
Option 2: Or Do you want to crop the image to a single rectangular sliver of the image?
To answer that question you may want a little bit more information about frame size, orientation and resolution.
The Evolution of the Vertical Frame
Tik-Tok was specifically designed with the purpose of publishing short vertical videos. As TikTok grew in popularity this marked a shift in the way videos were shot. Posting a video on this platform, meant that it would fill the entire frame of the phone without turning it 90 degrees to watch it. In addition, videos on TikTok were required to be short and easily digestible.
This development was bound to happen as the popularity of phone cameras evolved, but the horizontal frame has been the standard for camera makers for almost all of film history. You can see a good example in the evolution of televisions.
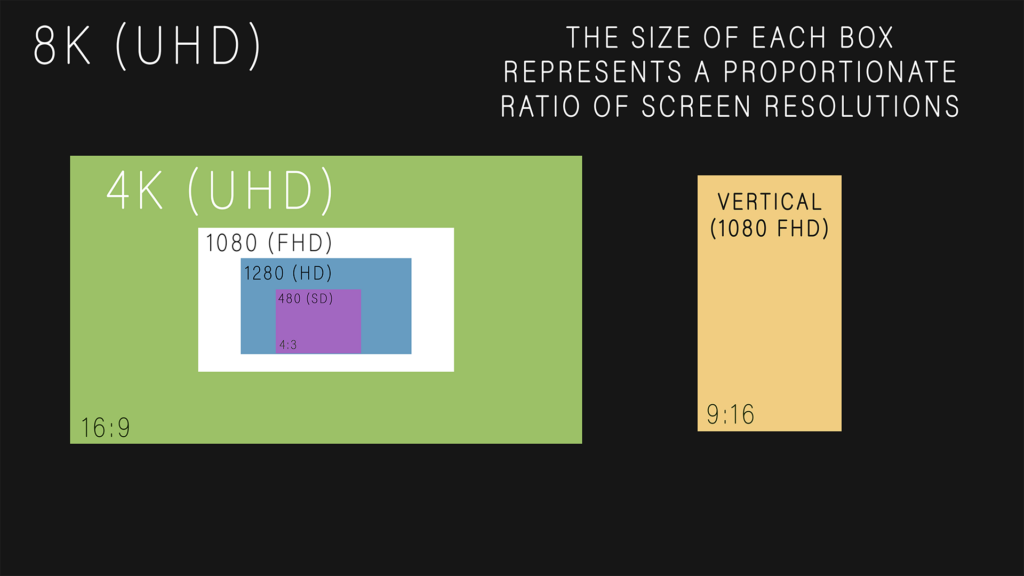
8k, 4K, 1080p and 1280p are all horizontal frames with the same ratio of height vs. width. The ratio is 16:9. The bigger the number, the clearer the image is in a bigger frame. If you scale down a 8K image proportionally to ¼ of its original size, you will have a 1080p image.
How does all of this affect the way we consume and produce media?
Screen Direction on a Horizontal vs. Vertical Frame
Think about reading traditional prose. You read left to right. Why? Because that’s the only way it makes sense for us to read English. If we tried reading from top to bottom, it would just be a jumbled mess of words that didn’t form any sentences. This concept of reading text is just as relevant when it comes to reading an image. A viewer’s eyes are going to be drawn to one area and from there they will understand the rest of the picture. If text is incorporated on screen, we would still interpret the image left to right so for English speaking audiences, action that moves left to right on screen does seem to indicate some progress and correctness. Objects that move right to left, may be seen as going backwards, against the grain. Objects that come directly at us may seem intimidating, all-encompassing, while objects that move further away may form some sense of relief or acceptance.
Bonus: Advance Method (For Editing Professionals)
The best way to accomplish videography for reels as a professional is to shoot in 4K and expect cropping. This isn’t the quickest way. But, it is the most efficient for videographers that need to make sure they are providing enough content back to the client and that the highlight reel only makes people want to watch more.
So, quick tips for the professional:
- When composing the frame, focus your effort on a small sliver of the screen usually the center, but the center can be fluid. Later, in editing, you’ll use keyframes to maintain the center of focus (if necessary).
- Try to avoid the extreme edges of the frame unless you are intending on something exiting the view.
Here’s a quick exercise in Keyframing with a vertical frame. You can try this if you want. If you do, please tag me in the post!
ENDLESS WALK PAN & SCAN TECHNIQUE
Imagine someone walking across a field. How far away could you be to still see the person walking across the entire field without moving the camera. What may be some obstacles and considerations while filming action in a wide landscape for a vertical frame.
POTENTIAL OBSTACLES
1. The physical boundaries of the space. The main goal is to show the widest possible view of the field and still see the action of a person walking across it without moving the camera. Possibly, there is no obstacle here. The field may be small enough to fit in the entire frame and still show the man walking from side to side.
- The physical boundaries may also be the inability for the camera to get far away enough from the subject to show the whole thing and still contain the relevant information.
- Conversely, if we move so far away that we can see the whole field, but we can no longer see the man, then we are discovering another physical boundary on this experiment.
CONSIDERATIONS
2. Consider Using the Biggest Image Option Possible. Once, you have figured out how far away you can be to show the action, consider using the biggest image possible. This is technically called the resolution.
- If your camera can be set to 4k that would allow you to use the full image without scaling and show the action. 8k would be even better (but, also requires super-accelerated processing)!
- When selecting the resolution, remember that you’ll need to edit these files later on your computer. If your camera doesn’t shoot in 4K, resolutions lower than 4K will produce fun results too.
3. Consider your framing. How big do you want the person to be in the frame. We want the person to be a certain size in the frame and we want them to consistently walk across the frame so they will stay the same size throughout the clip.
- For example, we think it will be interesting to keep the subject in the lower 2/3rds of the frame leaving open sky above him.
So, we consider those 3 things, the physical boundaries of the space, the size of the image, and the composition of the frame.
RECORDING STEPS
- Place the tripod with the above conditions.
- Once the tripod is place and pointed in the direction we want to record action. We hit record. There is no need to move the camera.
- We direct the actor to move across the field and tell them not stop until we say CUT. We will say cut when the subject has reached the opposite edge of the frame. (No actor? Just record yourself doing it!)
- We yell CUT when our subject has reached the edge of the frame and then stop recording.
- It takes 30 – 90 seconds for this clip to be recorded.
Editing Procedure (Requires NLE)
- Place the clip into a timeline.
- Set sequence settings to be formatted as a 1080×1920 frame
- Now we will use Effect Controls to find the center of action and follow the movement across the screen. This is also called panning and scanning.
- In the Effect Controls panel, under the Motion category. Place a keyframe toward the beginning of the clip and adjust the X-axis variable to the place where your character starts.
- As he starts to walk, resist the temptation to follow him with key frames. Instead skip to the end of the clip where your character reaches his final place (if he keeps walking off frame just stop at the far edge of the frame) and place another keyframe with the X-axis variable at that point.
- The NLE will adjust the clip between the two points, and your character will start and stop in frame as the image is digitally panned. Chances are you may need to adjust for areas where your actor was moving slower or faster than the average speed. It will be obvious where and how to do this if you were able to get this far and all you should need to do is manipulate the X-axis variable. If for whatever reason, you need to follow action up and down, you would use the Y-axis variable.
New Challenges for Old Filmmakers
This shift in the frame has proposed a challenge to filmmakers. Do you shoot everything with your phone now?
Do you turn your DSLR sideways?
Do you shoot really big in 4-8k and anticipate cropping and keyframing?
All of these are viable options.
Davey Rockwell Post-Production is not an ad agency, although ad agencies love to work with us to produce content for their brands. If you’re interested, please reach out to 727-643-3737.

